Camera Tips for Protecting Water Facilities
Things to consider when protecting critical water facilities against theft and intrusion using video.
There are many guidelines available providing information on what to consider when protecting water and wastewater facilities using video surveillance. Whether you're installing a new system or reviewing an existing one, remembering a few key tips can go a long way toward ensuring the implementation meets the objective.
1.Understand Your Camera
Most folks start with the camera lens, typically opting for a wide lens to be able to view as much of their facility as possible. This is a valid approach; just remember that widening the view dilutes your pixels, which means less detail for any specific target. Resolution is typically the next consideration. Higher means more pixels and the ability to "see" greater distances and more details. However, it also means greater network usage, storage costs and processing requirements. To understand what resolution is required, consider the smallest target you want to detect (e.g., human, car, bird) and the number of pixels required to be able to "see" that object at the desired distance. That should set your maximum resolution.
2.Consider the Terrain
Trees and buildings are obvious but don't forget to consider terrain variations, such as rolling hills, ditches and culverts, which can all introduce blind zones. Even looking through a chain link fence can be very problematic when viewed from particular angles.
3. Look to the Future
Plan for vegetation growth. That cute little sapling may not affect the perimeter today, but how is it going to impact your camera view in a few years? You can try to keep it trimmed, but remember that landscaping services are recurring costs. So making intelligent camera placement decisions can prevent these costs over many years.
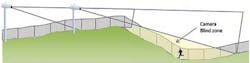
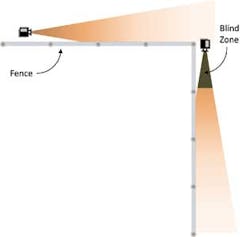
4. Check your Blind Zone
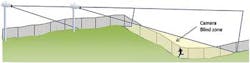
A camera's blind zone is determined by the camera lens and its mounting height and angle. If you assume a human target, the blind zone begins at the mounting location of the camera and ends at the point where you can see their entire body in the video. Most blind zone mistakes occur when the coverage takes a turn, for example, at the corner of a property. Cameras are often placed directly at the corner of the property, making it very difficult for the previous camera to cover the blind zone.
5. Don't get stuck in the Dark
A camera protecting 500 yards of fence line during the day may be reduced to only 200 yards at night due to illumination. Infrared and white light allow facial and license plate details, but this adds equipment and is susceptible to weather conditions. Thermal cameras cost more and do not provide target details, but they do perform well in most weather. Bottom line: take the time to consider how the scene will be covered in nighttime operations.
6. Get an Image
A very powerful and often overlooked action is to get an image from each proposed camera location, mimicking the intended view. Reviewing proposed views goes a long way in uncovering placement problems. Images are great collaboration tools to gain consensus to insure that the location and view will achieve the cameras' intended mission.
7. Utilize the proper tools

There are many camera design tools available. Two key ones include a camera worksheet and a layout tool. A camera worksheet maintains the essential details of your security cameras: objective, brand, model, lens, location, detection distance, and illumination. It is not overly complex, but it can save hours of headaches by having one location for pertinent camera details.
A camera layout tool allows you to visualize your video protection. You can do it yourself with drawing tools or contact a security consultant or integrator. They will have specialized layout tools and services that they will typically provide at no charge. In all cases, the objective is to get a visual representation of the protection provided by your security cameras.
Editor's Note: This article was adapted from a White Paper offered by PureTech Systems Inc., a manufacturer of wide-area perimeter surveillance software solutions including internally developed outdoor video analytics, PTZ Auto Follow, multi-sensor integration and map-based (real object size) command and control. The full paper may be downloaded here: www.puretechsystems.com/7TipsRequest.html.
More WaterWorld Current Issue Articles
More WaterWorld Archives Issue Articles